- Home
- Program Description
- Feature List
- Jewish Features
- Page of Testimony Lesson
Page of Testimony - Lesson
Ancestral Quest allows you to enter information on families and individuals as you gather family information. If you know of a person who was a victim of the Holocaust, you can enter that information into Ancestral Quest, whether that person is related to you or not.
This lesson will take you through the process of entering information on one famous Holocaust victim, Anne Frank, so you can see how this can be done.
See a Page of Testimony as produced by Ancestral Quest, ready to be sent to Yad Vashem
First, we will turn on the ability to creat the Page of Testimony in the program Preferences. Open up Ancestral Quest if you have not already done so, and go to the menu bar (located at the top of any main AQ screen). Click on Tools, then click on Preferenceswhich will bring you to the Ancestral Quest Preferences screen.
Click the General tab, if necessary, then on the right side, locate the option labeled Enable Page of Testimony Data. Click that box to enter a checkmark, then click OK at the bottom of the Preferences screen to save the change.
It can be easiest to work from the Family view
Locate the person in your database for whom you will print a Page of Testimony, then click the record to select it, and then edit the individual record (from the Menu bar, select Edit then Individual).
If the record of the desired person does not already exist in the database, add a new record to the family (Click Add Spouse, orAdd Child, or Add Father, or Add Mother).
Within the Edit Individual (of a record you already have in the database), or the Add... window (for a new record you are adding), enter the basic information for this person.
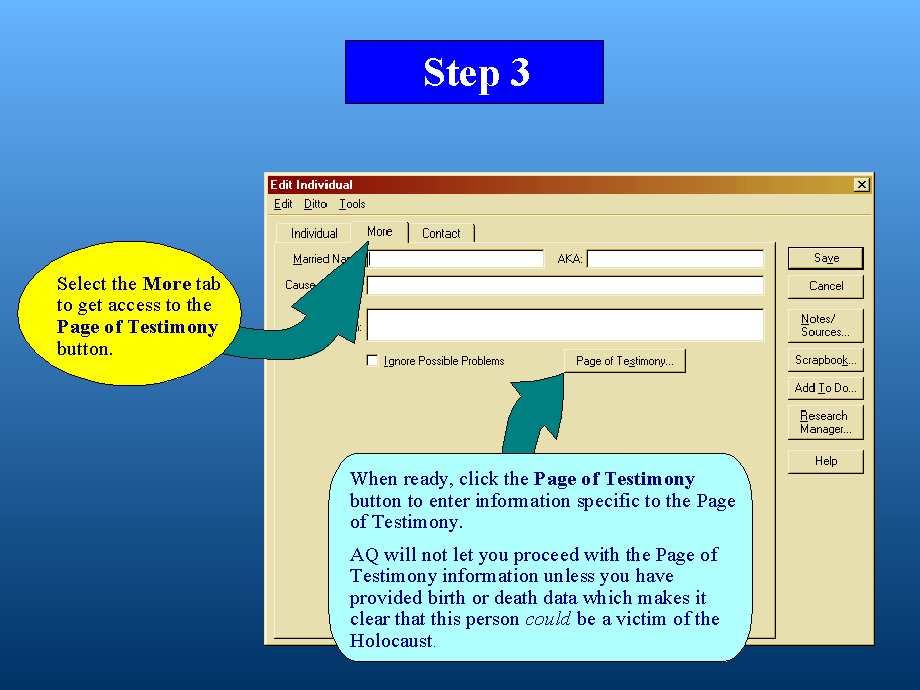
At the top of this window, click the More tab to acces the Page of Testimony button. If this button does not appear, return to the Preliminary step, above, to Enable the Page of Testimony Data.
Click the Page of Testimony button to enter the information specific to the Page of Testimony.
AQ will not let you proceed with the Page of Testimony steps unless you have provided birth or death data which makes it clear that this person could be a victim of the Holocaust.
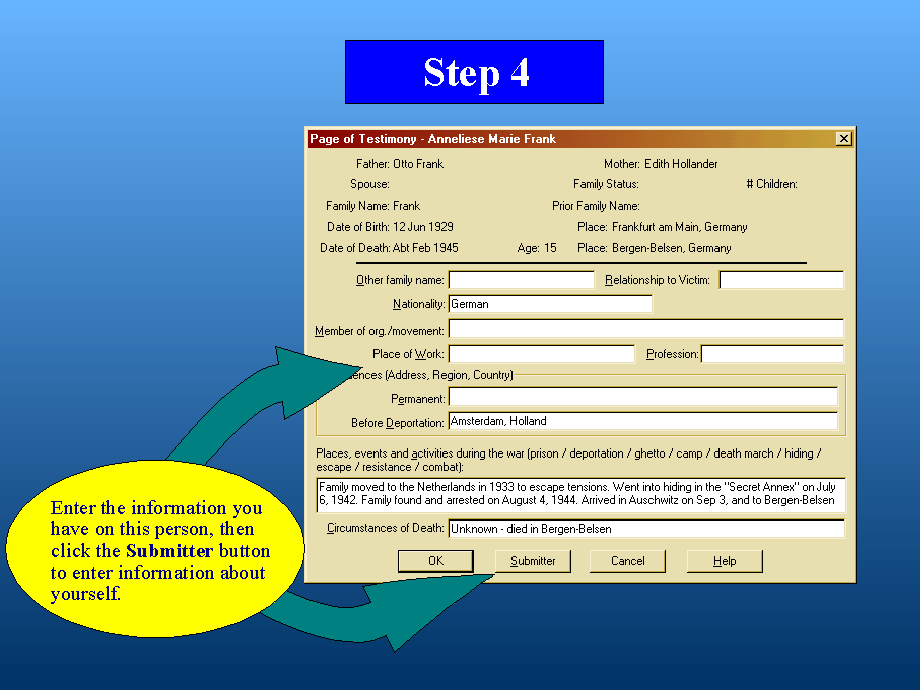
Enter the information you have on this person.
Click on the Submitter button to enter information about yourself.
Enter the information on yourself, as the submitter of the Page of Testimony.
Click the OK button to save the changes to the Submitter screen.
Click the OK button to save the changes to the Page of Testimony screen.
Click the Save button to save the changes to the Add/Edit Individual screen.
Back on the Family view, you should see the record of the person for whom you added the Page of Testimony data. Be sure that this record is selected (highlighted).
You can click the Scrapbook button on the Toolbar to add a picture of this person, if you have one.
To generate the Page of Testimony document, open the Reports and Charts screen (click the Reports button on the toolbar, or on the menu bar, select File, then Print Reports and Charts).
At the top of the Reports and Charts screen, click on the tab labeled Page of Testimony. Down in the Starting Person section, be sure that the name of the record you had selected is shown.
In the lower-right corner of this window, leave the Destination set to Printer/Screen.
Click the Printer Setup button to determine how the document will be generated.. either by way of your physical printer to paper, or throgh a PDF Printer that will save a PDF file. For more info on saving PDF files from Ancestral Quest, visit the Install PDF page of our website.
You can click the Preview button to see how the report wil look. If you discover that you need to correct any information before generatng the final copy, go back and edit the record as needed.
To generate the Page of Testimony document, click the Print button. If you chose to send the report to a printer, it will be printed. If you are saving a PDF file, a window will appear for you to give the report a name and decide where to save the PDF file.
You can click on the Help button for directions on how to submit the Page of Testimony that you have generated to Yad Vashem in Jerusalem.
When you are finished, click the Close button to exit the Reports and Charts screen.


